Installing the SEVEN Automatic Soiling Sensor correctly is vital to ensuring accurate data collection and reliable system performance in tracker-based PV systems. This guide compiles proven field practices and essential installation checks to help you avoid common mistakes and get it right the first time.
Why Must the Tracker Orientation and Tilt Match Exactly?
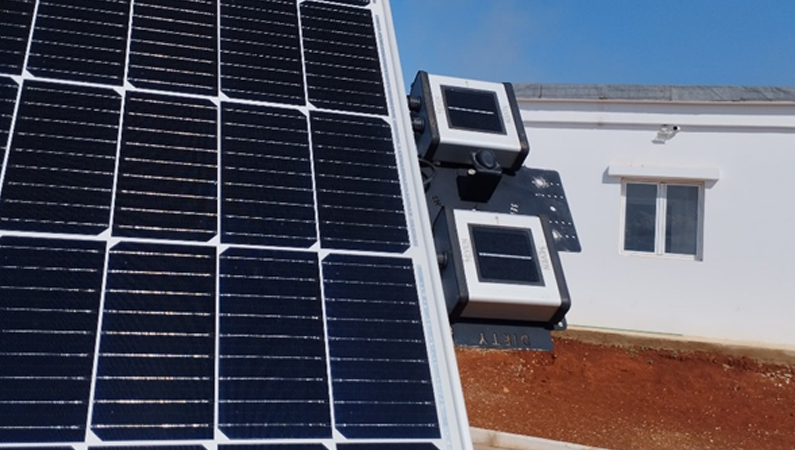
It is essential that the soiling sensor follows the exact motion of the PV modules. Otherwise, the data won’t make sense. If your tracker tilts or rotates, the sensor has to do the same.
![]()
In practice, here is what works:
- Mount the sensor arm right on the moving torque tube or frame, not on nearby static structures.
- Check that the clean and soiled cells are positioned at the same angle and orientation as the modules.
- Stand back and make sure both cells are exposed to sunlight the same way the panels are.
Even a small mismatch in tilt or azimuth can throw off the soiling ratio and lead to bad data. You might get false alarms or end up scheduling unnecessary cleanings, and that costs time and money.
Where Should You Install the Sensor for Accurate Results?
This is something that is easy to overlook. There are cases where the sensors are installed at the edges of arrays, next to access roads, or under partial shade, and that affects the results.
Here is what to keep in mind:
- Stick to a central location within the array, ideally on a row that represents the average site conditions.
- Avoid spots that are shielded by structures, close to vegetation, or more exposed to wind-blown dust.
- Try to match the sensor’s elevation with where the actual PV modules sit, and don’t mount it too high or too low.
If the sensor is not exposed to the same soiling environment as the rest of the system, the data can’t be trusted.
How Can You Avoid Electrical Interference During Setup?
The sensor uses Modbus RTU over RS-485, a low-voltage signal easily affected by electrical interference if not installed correctly.
From experience, here is what works:
- Keep communication cables at least 30 cm away from AC or DC power lines
- Always use SEVEN’s shielded twisted pair cables and ground them properly
- Protect all cable entry points with conduit or grommets
- Leave slack loops to account for tracker movement
Why this matters: We have seen communication errors caused by noise from inverters or motors. It is preventable, so just route and shield your cables carefully.
What Should You Watch for During Sensor Cleaning?
This one is critical. In tracker systems, the clean irradiance sensor must face downward during the cleaning process. If it is positioned higher than the soiled irradiance sensor, the cleaning fluid can spill downward, cleaning the soiled sensor.
Why this matters: If liquid accidentally hits the soiled cell, your system will report falsely clean conditions, throwing off your soiling ratio and affecting cleaning schedules or O&M alerts.
Pro Tip: Always double-check irradiance sensor positions during both installation and maintenance.
When and How Should You Schedule Sensor Cleaning?
Be cautious when setting the automatic cleaning schedule. The initial cleaning is pre-configured by the SEVEN team to occur three hours before local noon. The two additional optional cleaning times can be programmed by the end user using the SEVEN Configuration Tool. However, scheduling cleaning while the soiled sensor is facing downward — as previously mentioned — can negatively impact soiling ratio measurements due to possible cross-contamination from the cleaning fluid.
What to do:
- Plan the washing time in the morning time when the clean irradiance is downwards.
- Adjust the Cleaning frequency based on the site conditions.
- Monitor cleaning effectiveness and re-evaluate timing as needed
Why Is Water Supply and Drainage Critical for Cleaning?
The built-in cleaning system is only as good as the water it receives.
Recommendations:
- Use pure water to avoid drops on the sensor.
- The tank capacity is 18 lt allowing a single daily cleaning during 6 months. So, if the cleaning frequency is increased, you must schedule refilling the water tank accordingly.
How Do You Calibrate and Register the Sensor Correctly?
Don’t forget the setup after mounting. This ensures correct communication and data logging from day one.
Checklist:
- Assign the correct Modbus address
- Confirm data communication with your SCADA or logger
- Run test measurements to verify both clean and soiled sensor readings
- Refer to the SEVEN sensor manual or contact technical support for guidance
Why Are Routine Visual Inspections Still Important?
Even with automatic cleaning, you should inspect the sensor during your routine O&M visits.
Look for:
- Spray nozzle blockages
- Loose wiring or brackets
- Physical damage or signs of wear
- Signs of misalignment or fluid residue near sensors
A well-installed SEVEN Automatic Soiling Sensor provides the reliable data you need to manage your site efficiently. Don’t cut corners, and invest time in a careful, field-tested install and you will avoid false alarms, reduce unnecessary cleaning, and maximize energy yield.
Frequently Asked Questions (FAQ)
How does the SEVEN sensor distinguish between clean and soiled conditions?
The sensor compares irradiance values from two separate cells—one clean and one exposed—mounted at the same angle as your PV modules.
What kind of water should be used for cleaning?
Use pure or demineralized water to avoid residue buildup or spotting on sensor surfaces.
How often should the system be inspected?
While cleaning is automated, visual checks during regular O&M visits are recommended to catch misalignments, blockages, or wiring issues.
